Do you want to place your static website on a hosting platform like AWS? Automate the deployment process by using GitLab and Amazon Web Services.
At Codica, we use GitLab CI (Continuous Integration) to deploy the project static files to Amazon S3 (Simple Storage Service) which is served by Amazon CloudFront. Also, we use ACM (Certificate Manager) to get SSL-based encryption.
In this article, our DevOps specialists will share their knowledge of AWS web hosting. Namely, we will provide you with our best practices on deploying static sites to Amazon Web Services (storing files on S3 and distributing them with CloudFront).
Glossary of terms
Before starting the guide, we let’s define the key terms that will frequently occur in the text.
Simple Storage Service (S3) is a web service offered by AWS. Put it shortly, it is cloud object storage that allows users to upload, store, and download practically any file or object. At Codica, we use this service to upload files of static websites.
CloudFront (CF) is Amazon's CDN (Content Delivery Network) based on S3 or another file source. Distribution is created and fixed on the S3 bucket or another source set by a user.
Amazon Certificate Manager (ACM) is a service by AWS that allows you to deploy and manage free private and public SSL/TLS certificates. In our case, we use this tool to deploy our static files on Amazon CloudFront distributions thus securing all network communications.
Identity and Access Management (IAM) is an entity that you create in AWS to represent the person or application that uses it to interact with AWS. In our case, we create IAM users to allow GitLab accessing and uploading data to our S3 bucket.
Configuring AWS account (S3, CF, ACM) and GitLab CI
First of all, we assume you already have a GitLab account so you need to sign up/in to your AWS profile to use the mentioned above services. If you create a new one, you automatically go under Amazon’s free tier which enables you to deploy to S3 for free during the first year. However, there are certain limitations in trial period usage.
1. Setting up an S3 Bucket
In order to set up S3, go to the S3 management console, create a new bucket, choose and fill in the name (i.e., yourdomainname.com) and the region, and finish the creation leaving the default settings.

After that, you need to set permissions to the public access in your created bucket. So it is important to make the website files accessible to users.
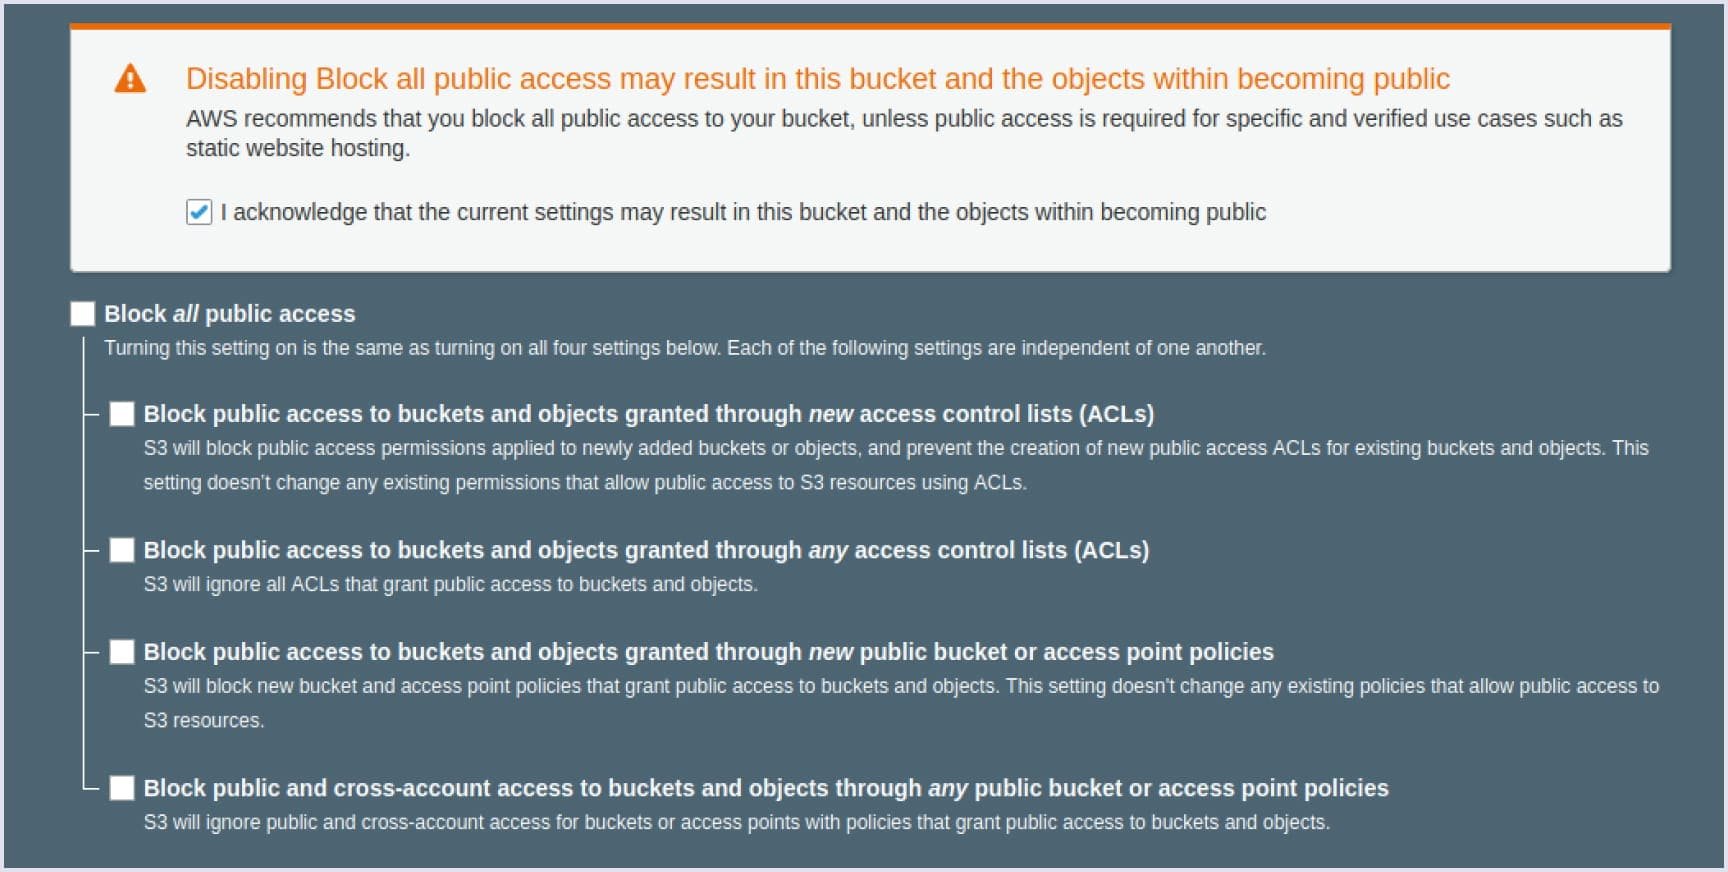
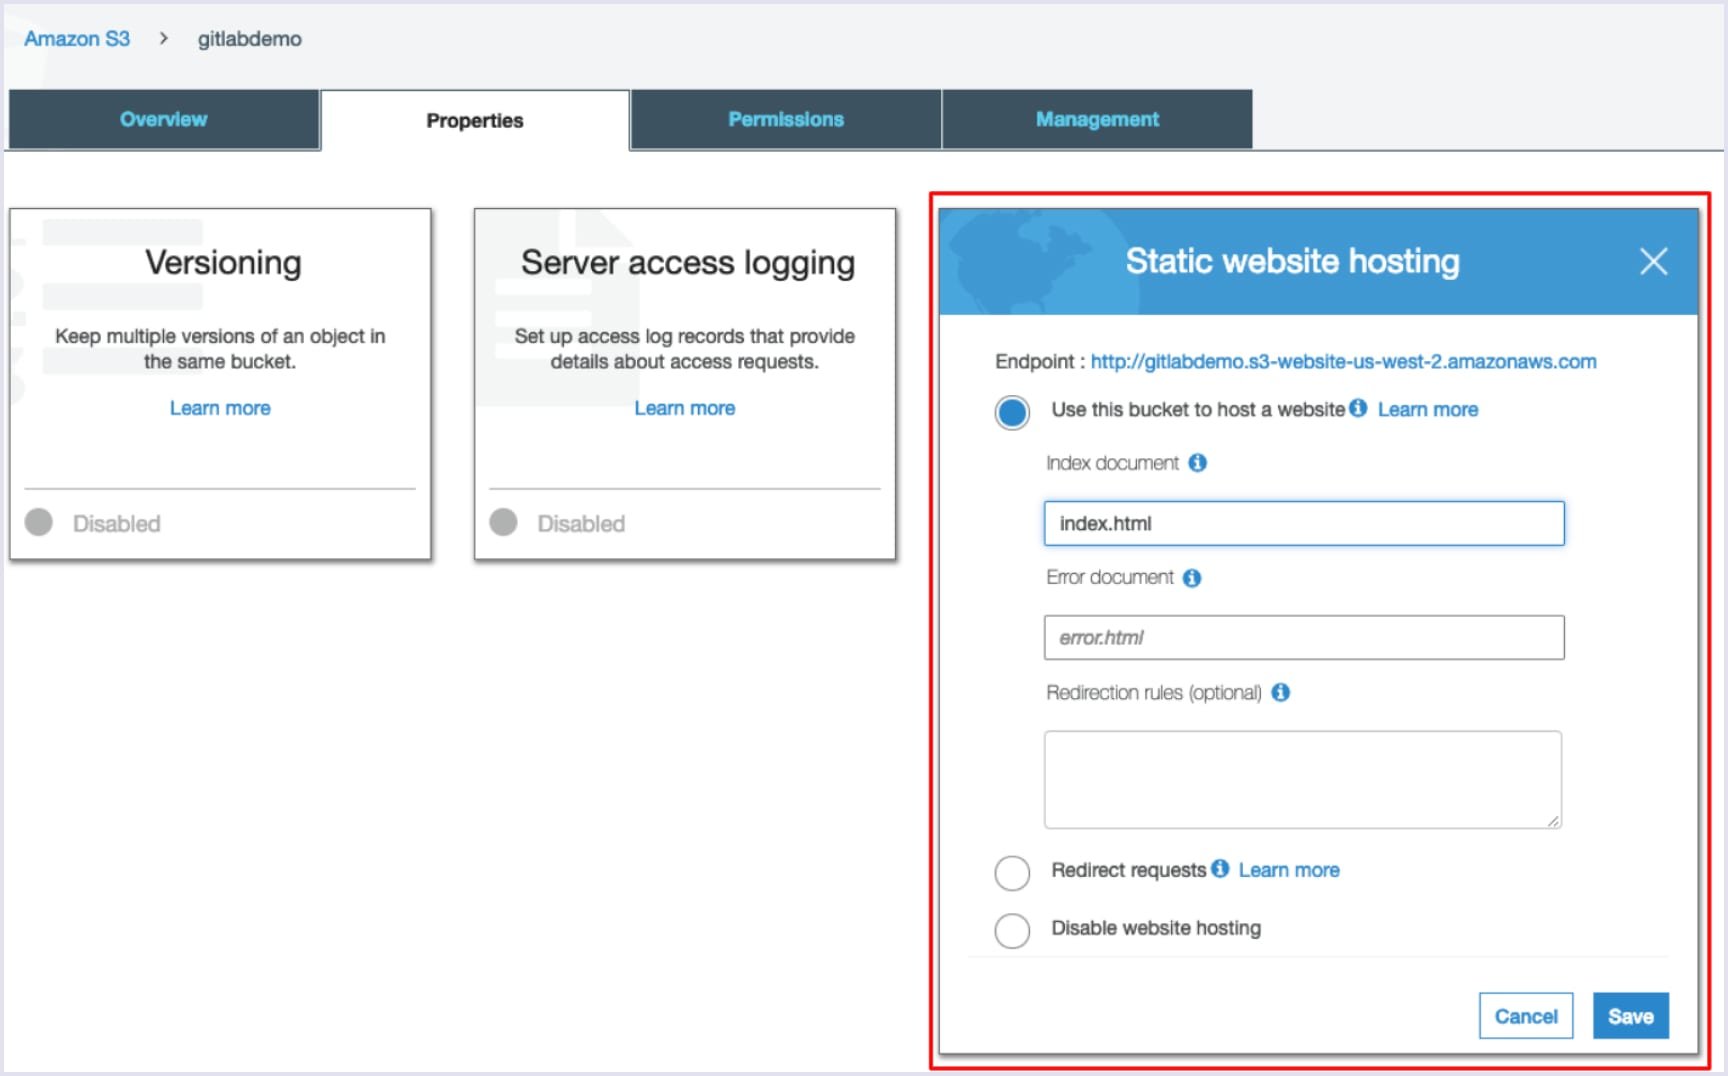
When permissions are set to public, go to Properties tab and select the Static website hosting card. Tick the box “Use this bucket to host a website” and type your root page path (index.html by default) into the “Index document” field. Also, fill in error.html for the “Error document” field.
Finally, you should make your website visible and accessible to users by providing read permissions to your S3 bucket. Go to the Permissions tab and click Bucket policy. Insert the following code block in the editor that appears:
{"Version":"2012-10-17","Statement":[{"Sid":"PublicReadForGetBucketObjects","Effect":"Allow","Principal":"*","Action":"s3:GetObject","Resource":"arn:aws:s3:::yourdomainname.com/*"}]}2. Creating an IAM user that will upload content to the S3 bucket
At this stage, you need to create an IAM user to allow GitLab to access and upload data to your bucket. So, go to the IAM management console and press the ‘Add User’ button to create a new policy with the name you prefer.
After that, add the following code and do not forget to replace the ‘Resource’ field value with the name created. It allows users to get data from your bucket.
{"Version":"2012-10-17","Statement":[{"Sid":"VisualEditor0","Effect":"Allow","Action":["s3:GetObject","s3:PutObject","s3:DeleteObject"],"Resource":"arn:aws:s3:::yourdomainname.com/*"},{"Sid":"VisualEditor1","Effect":"Allow","Action":"s3:ListBucket","Resource":"*"}]}After that, you can create a new user. Tick the Programmatic access in the access type section and assign it to the policy we just created.
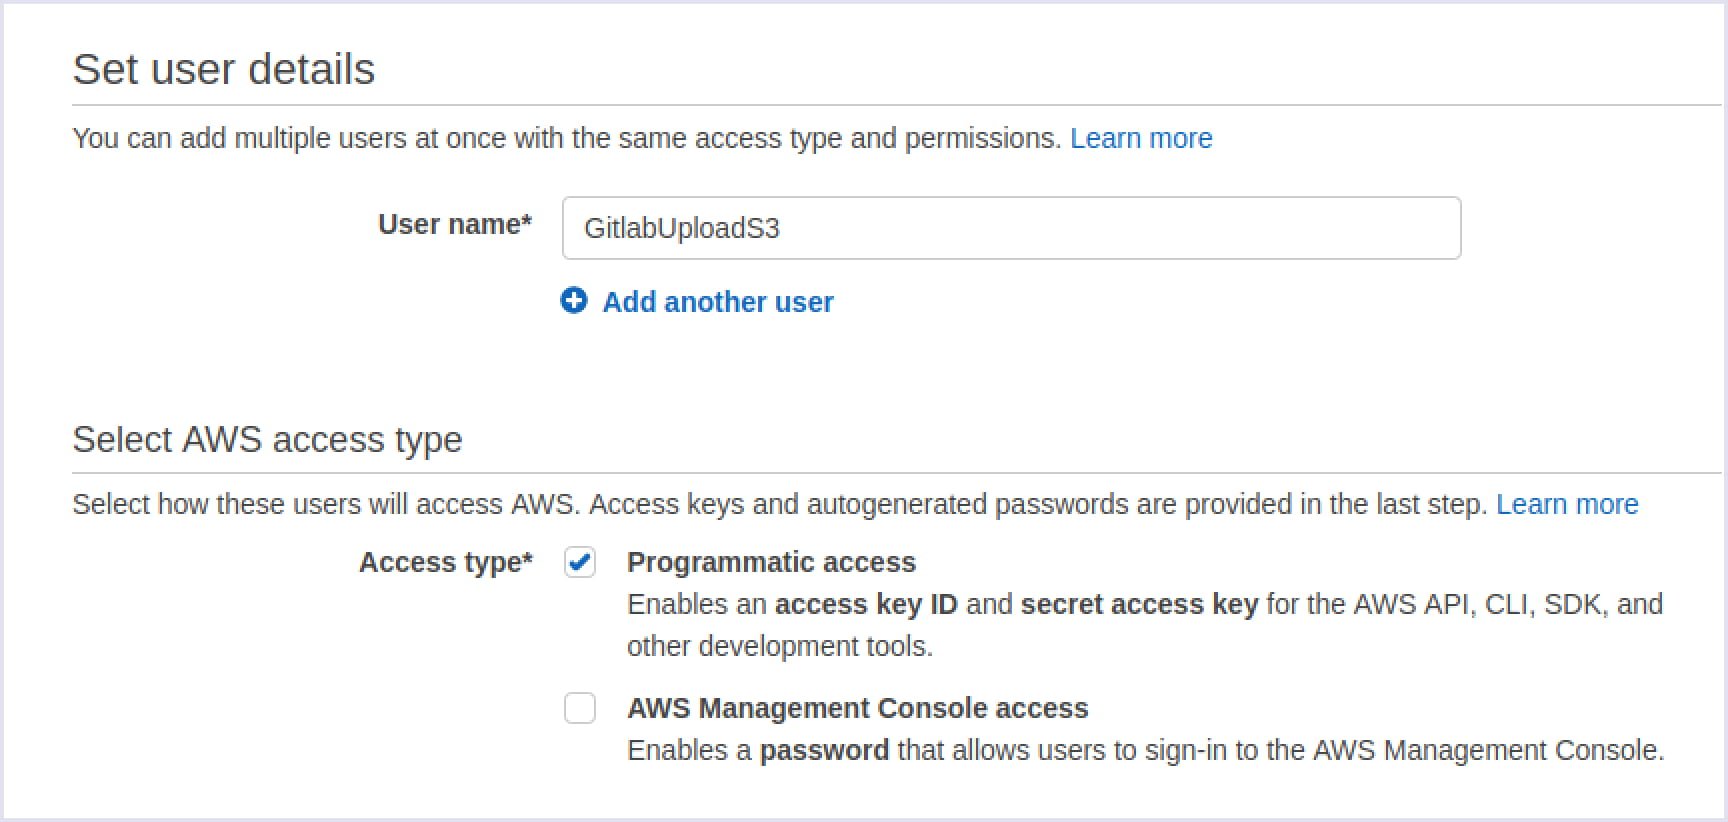
Finally, you need to click the ‘Create user’ button. You will get two important values: AWS_ACCES_KEY_ID and AWS_SECRET_ACCESS_KEY variables. If you close the page, you will no longer be able to get access to the AWS_SECRET_ACCESS_KEY. For this reason, we recommend writing down the key or downloading the .csv file.
3. Setting up GitLab CI configuration
The next step of AWS web hosting is to establish the deployment process of your project to the S3 bucket. To achieve this, you need to set up GitLab CI correctly. Sign in to your GitLab account and navigate to the project. Click Settings, then go to the CI / CD section and press the ‘Variables’ button in the dropdown menu. Here you need to enter all the necessary variables, namely:
AWS_ACCESS_KEY_IDAWS_SECRET_ACCESS_KEYAWS_REGIONS3_BUCKET_NAMECDN_DISTRIBUTION_ID.
You do not have a CDN_DISTRIBUTION_ID variable yet, but don’t worry. You will get it after creating CloudFront distribution.
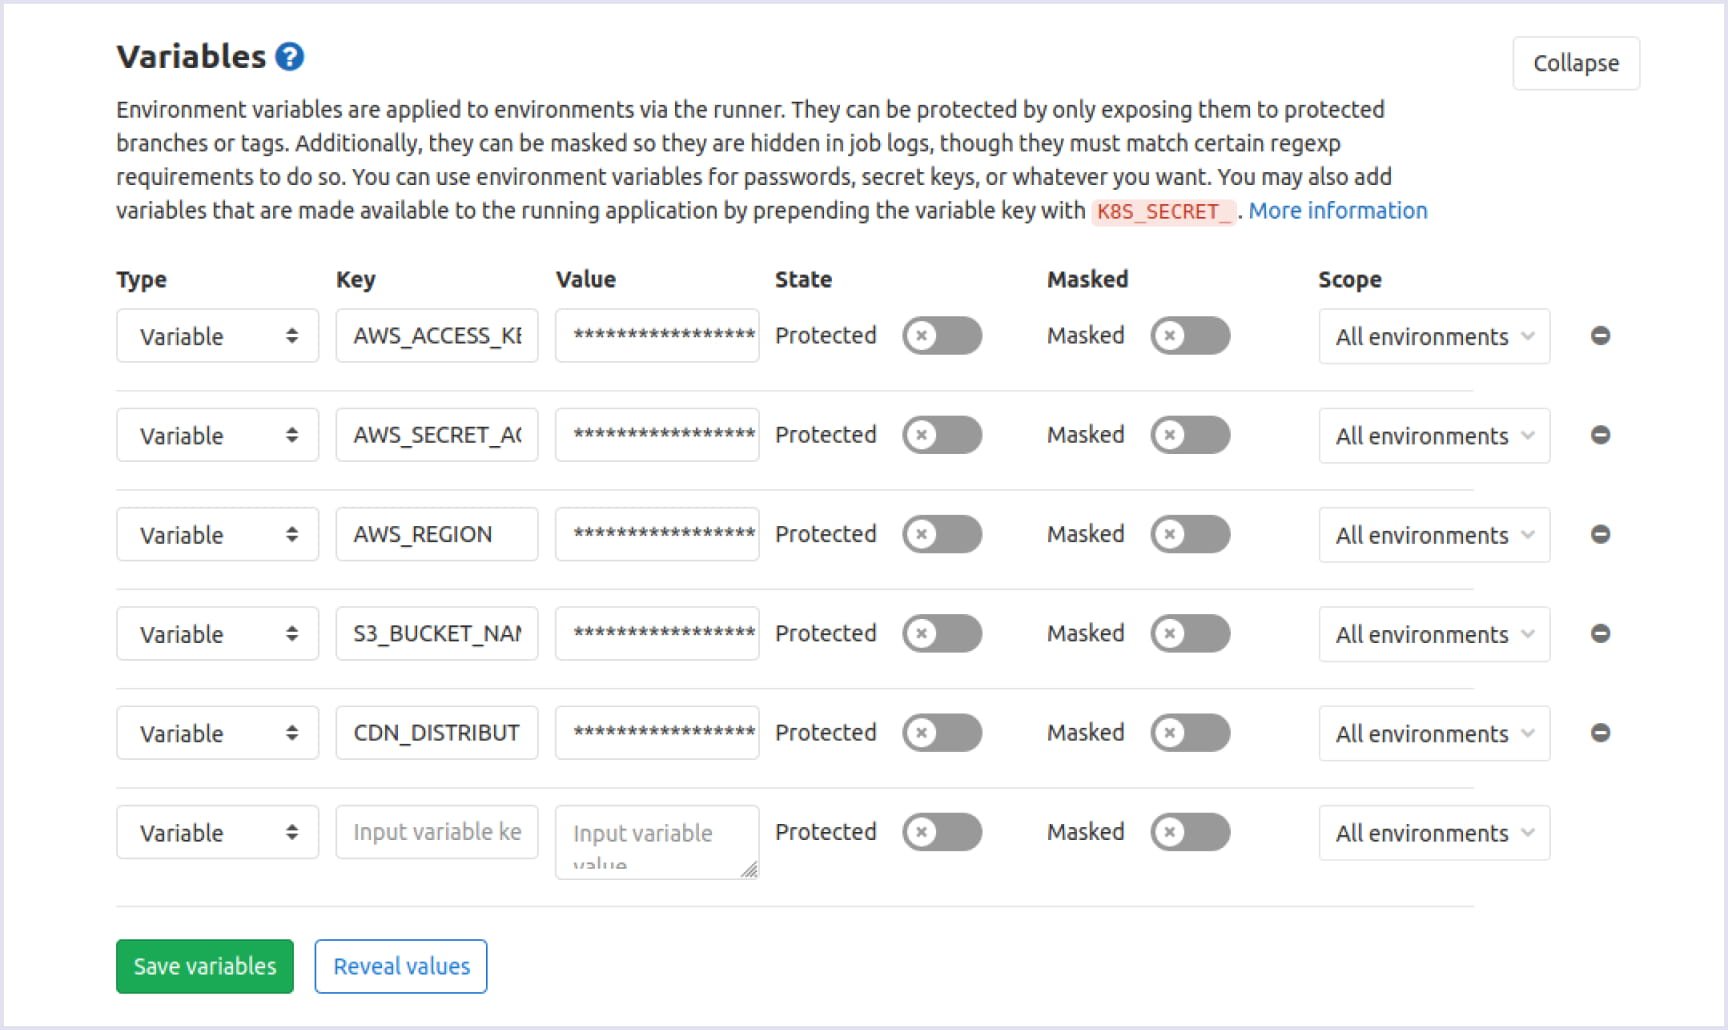
At this stage, you need to tell GitLab how to deploy your website to AWS S3. It can be achieved by adding the file .gitlab-ci.yml to your app’s root directory. Simply put, GitLab Runner executes the scenarios described in this file.
Let’s now take a look at .gitlab-ci.yml and discuss its content step by step:
image: docker:latest

services:- docker:dind
An image is a read-only template with instructions for creating a Docker container. So, we specify the image of the latest version as a basis for executing jobs.
stages:- build
  - deploy

variables:# CommonAWS_ACCESS_KEY_ID: $AWS_ACCESS_KEY_ID
  AWS_SECRET_ACCESS_KEY: $AWS_SECRET_ACCESS_KEY
  AWS_REGION: $AWS_REGION
  S3_BUCKET_NAME: $S3_BUCKET_NAME
  CDN_DISTRIBUTION_ID: $CDN_DISTRIBUTION_ID
On the above code block, we specify the steps to pass during our CI/CD process (build and deploy) with the variables they need.
cache:key: $CI_COMMIT_REF_SLUG
  paths:- node_modules/
Here we cache the content of /node_modules to easily get the required packages from it later, without downloading.
########################   BUILD STAGE	########################Build:stage: build
  image: node:11script:- yarn install
	- yarn build
	- yarn export
  artifacts:paths:- build/
	expire_in: 1 day
At the build stage, we collect and save the results in the build/ folder. The data is stored in the directory for 1 day.
########################   DEPLOY STAGE   ########################Deploy:stage: deploy
  when: manual
  before_script:- apk add --no-cache curl jq python py-pip
	- pip install awscli
	- eval $(aws ecr get-login --no-include-email --region $AWS_REGION | sed 's|https://||')
In the before_script parameter, we specify necessary dependencies to install for the deployment process.
script:- aws s3 cp build/ s3://$S3_BUCKET_NAME/ --recursive --include "*"- aws cloudfront create-invalidation --distribution-id $CDN_DISTRIBUTION_ID --paths "/*"Script parameter allows deploying project changes to your S3 bucket and updating the CloudFront distribution.
In our case, we have two steps to pass during our CI/CD process: build and deploy. During the first stage, we make changes in the project code and save results in the /build folder. At the deployment stage, we upload the building results to the S3 bucket that updates the CloudFront distribution.

Subscribe to our blog for the latest materials from our experts.
4. Creating CloudFront Origin
When you upload the needed changes to S3, the final goal is to distribute content through your website pages with the help of CloudFront. How does this service work?
When users visit your static website, CloudFront provides them with a cached copy of an application stored in different data centers around the world.
For example, if users come to your website from the east coast of the USA, CloudFront will deliver the website copy from one of the east coast servers available (New York, Atlanta, etc). This way, the service decreases the page load time and improves the overall performance.
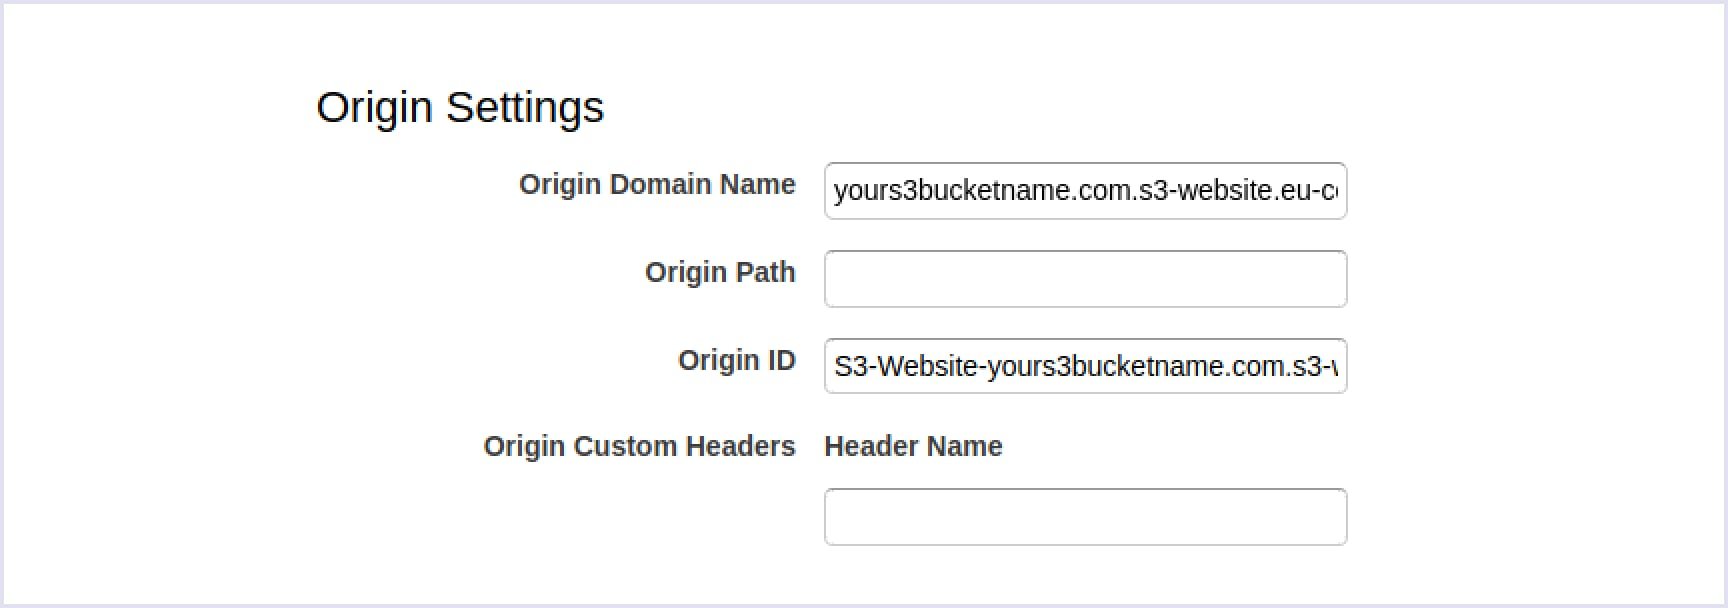
To begin with, navigate to the CloudFront dashboard and click the ‘Create Distribution’ button. Then you need to enter your S3 bucket endpoint in the ‘Origin Domain Name’ field. Origin ID will be generated automatically by autocompletion.
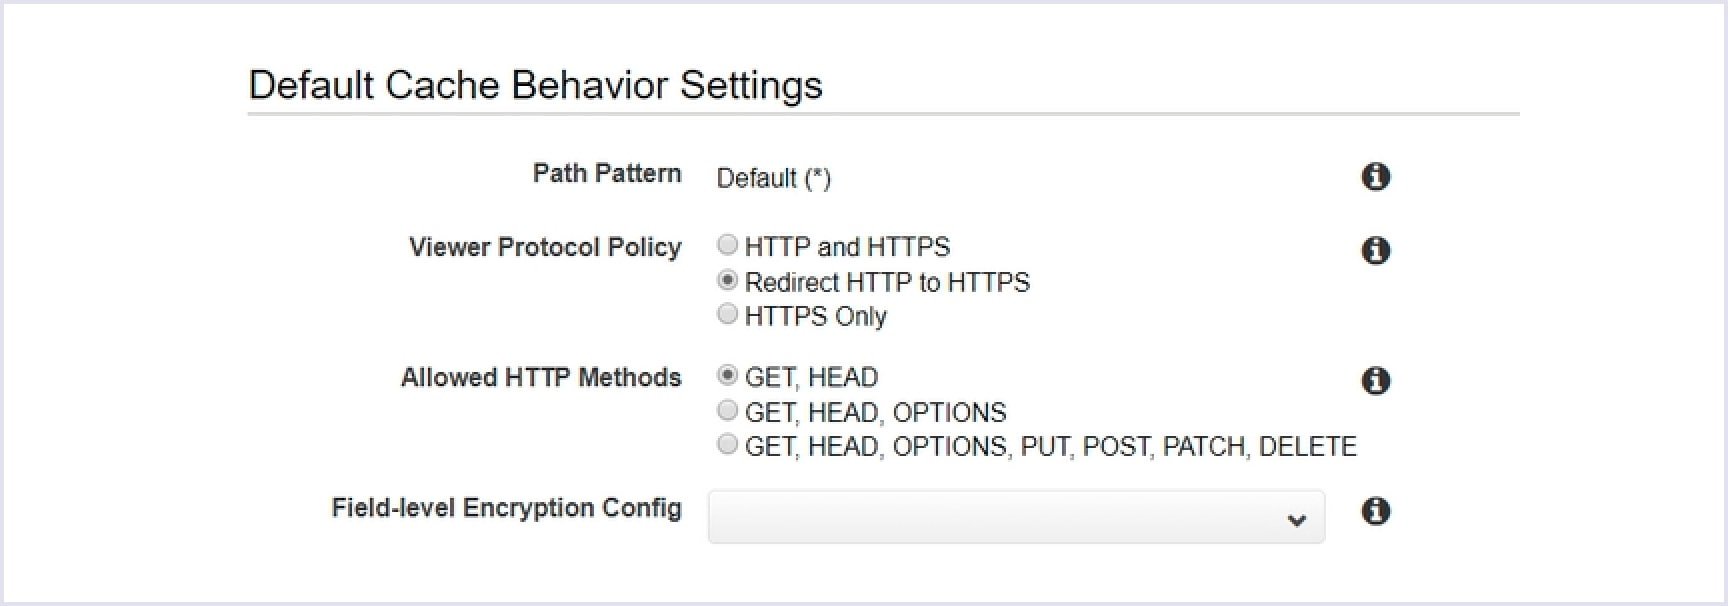
After that, proceed to the next section and tick ‘Redirect HTTP to HTTPS’ option under the Viewer Protocol Policy section. This way, you ensure serving the website over SSL.
Then, enter your real domain name within Alternate Domain Names (CNAMEs) field. For instance, www.yourdomainname.com.
At this stage, you get a default CloudFront SSL certificate so that your domain name will include the .cloudfront.net domain part.
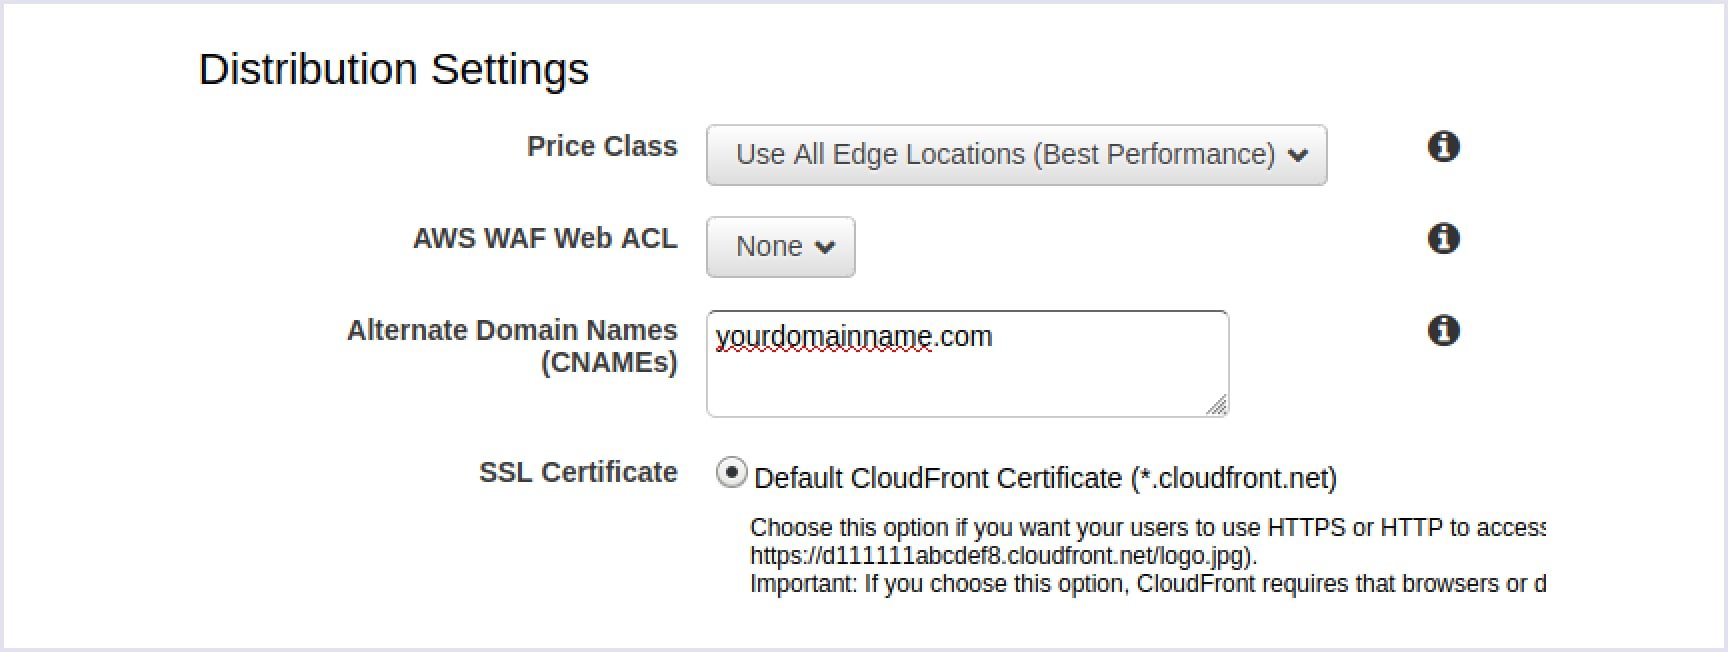
If you want to get a custom SSL, you need to click the Request or Import a Certificate with the ACM button.

Change your region to us-east-1, navigate to Amazon Certification Manager and add a preferable domain name.
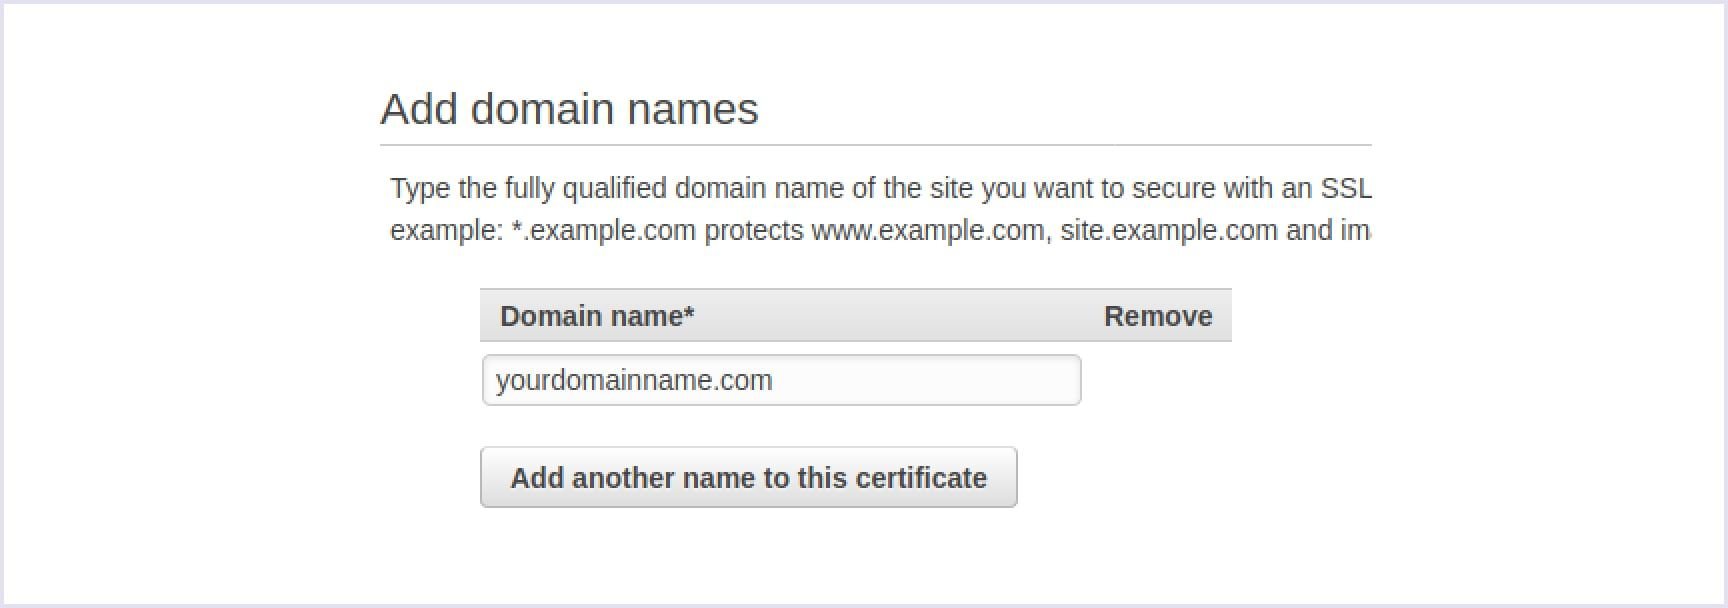
In order to confirm that you are the owner of the domain name, navigate to the settings of DNS, and specify CNAME there.
Once you have generated an SSL certificate, select the “Custom SSL Certificate” in this section.
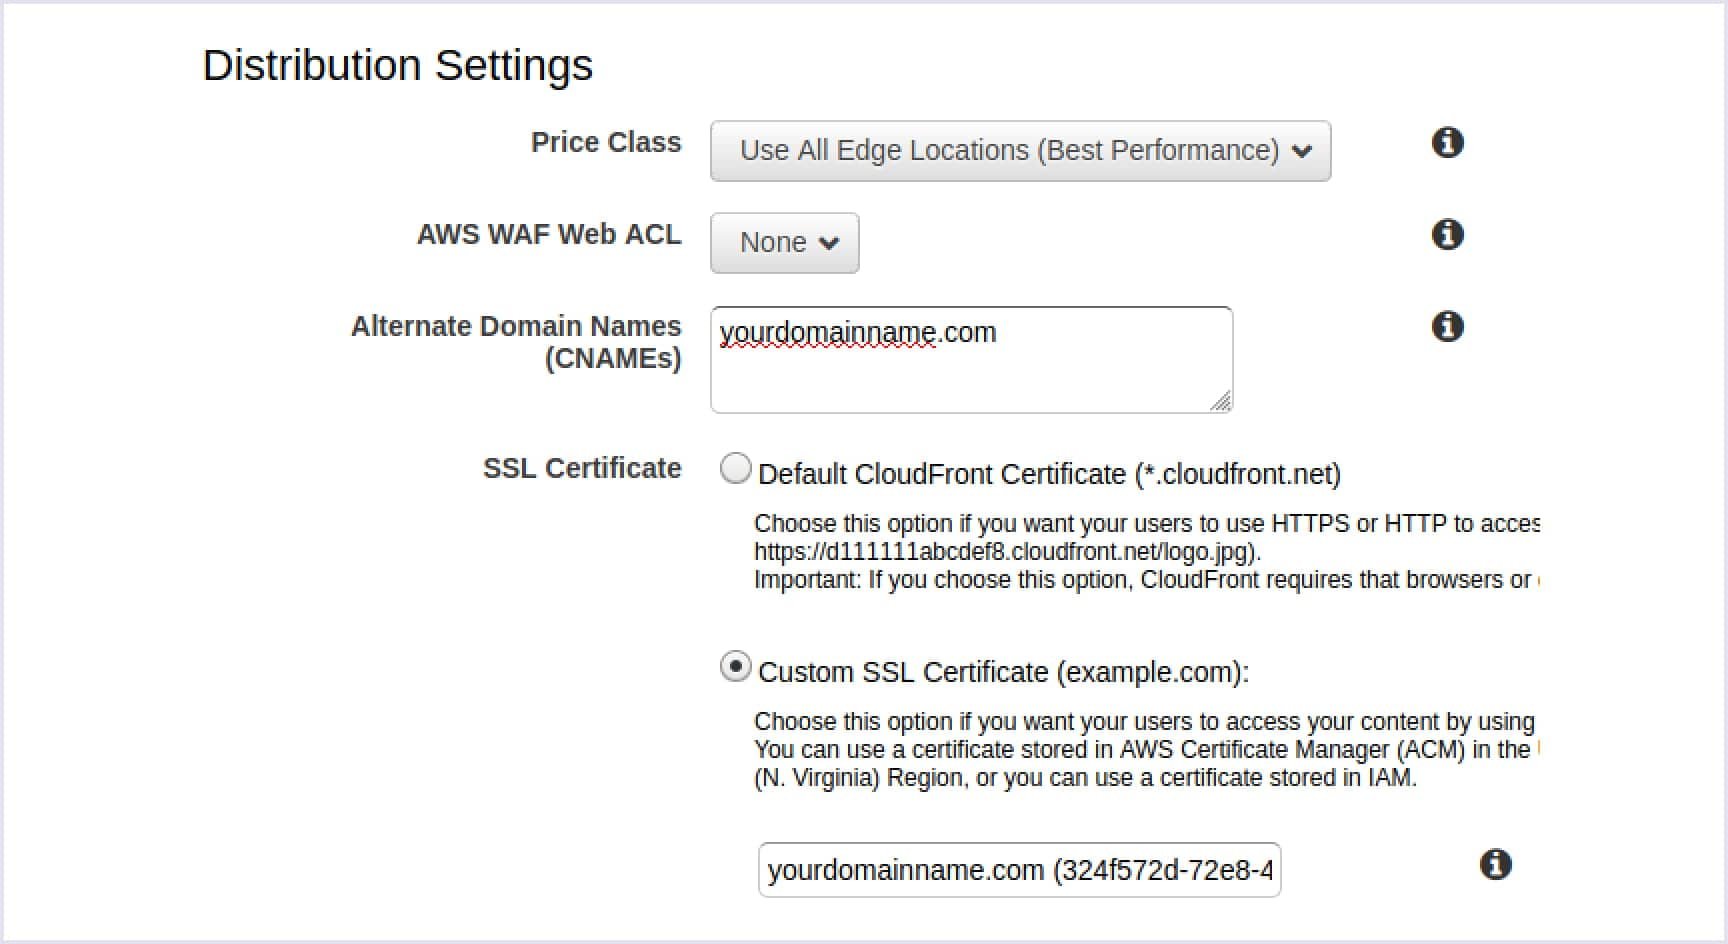
Finally, leave the remaining parameters set by default and click the ‘Create Distribution’ button.
This way, you create a new CloudFront origin that will be added to all the AWS edge networks within 15 minutes. You can navigate to the dashboard page and take a look at the State field which shows two conditions: either pending or enabled.
When the provisioning process is finished, you will see that the State field’s value is changed to Enabled. After that, you can visit the website by entering the created domain name address in an address bar.
Final thoughts
In this article, we have shared our knowledge of web hosting on Amazon and our DevOps services and solutions in deploying static sites to AWS (storing files on S3 and distributing them with CloudFront) using GitLab CI.
We hope that our guide was helpful, and we highly recommend that you explore all the possibilities of DevOps deployment tools (GitLab CI/CD) and services of AWS web hosting to improve your development and operations skills.

