The early bird catches the worm. But the situation was not so favourable back in 2007 when Steve Jobs proposed the idea of web applications to be the model for iPhone Apps. Back then, the tech community was not yet ready to bring a huge interest in web apps.
But since 2015, tech giants like Google and Microsoft have been preparing the tech ground for progressive web apps (or simply – PWAs). And now, PWA became a must-have technology for both giant corporations and small startups. Twitter, Starbucks, Google, and Aliexpress use progressive web apps to boost their online presence.
At Codica, we have been helping our customers to develop their businesses by building robust PWA for our customers since 2015. That is why we have created this comprehensive guide on how to create a PWA with React. Also, you will see the most prominent progressive web app examples.
What are Progressive Web Apps?
Before we proceed to the Progressive Web Apps guide, let’s look at PWA development basics and definitions.
PWA definition
A PWA is a web application that captures the benefits of native and web applications. It offers hardware features, wrapped in the body of a cross-platform app that is faster, easier, and cheaper to create and maintain than a native app.
Below you can see one of the most prominent examples of PWA – Pinterest app. It can easily be used on both mobile and desktop devices for your convenience.
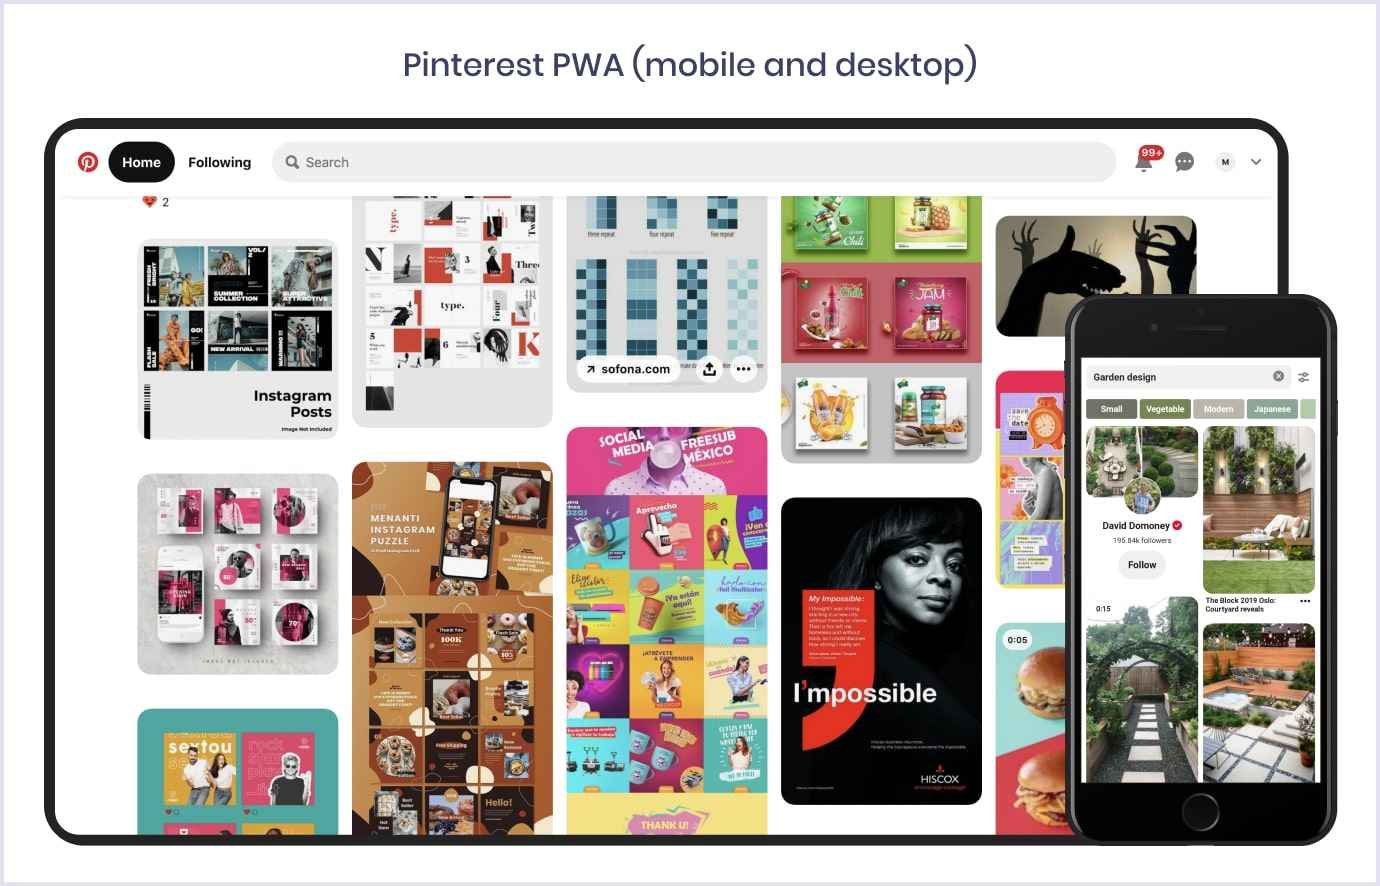
PWAs support functionality that is not available for regular websites. It includes offline work, push notifications, access to geolocation, camera, microphone, etc. A PWA can even work outside of a browser, using a native app shell that can launch at startup. You can find many more useful features that make the Web feel more native on WhatWebCanDo.
PWA development relies on a huge ecosystem of tools and frameworks for Web that Android or iOS developers can only dream of. And this is not, of course, the only reason why developers love PWAs. Deployment and maintenance are also much easier with progressive web apps. They are fast to build and offer only one version of the application that needs to be supported.

Are you wondering how to install a progressive web app on your devices? It is very easy, and a kid could handle this job:
- For smartphone users: find an ‘Add to Home screen’ button (in the notifications provided by the website or in the browser settings).
- For desktop users: go to the address bar and find the install button on the right.
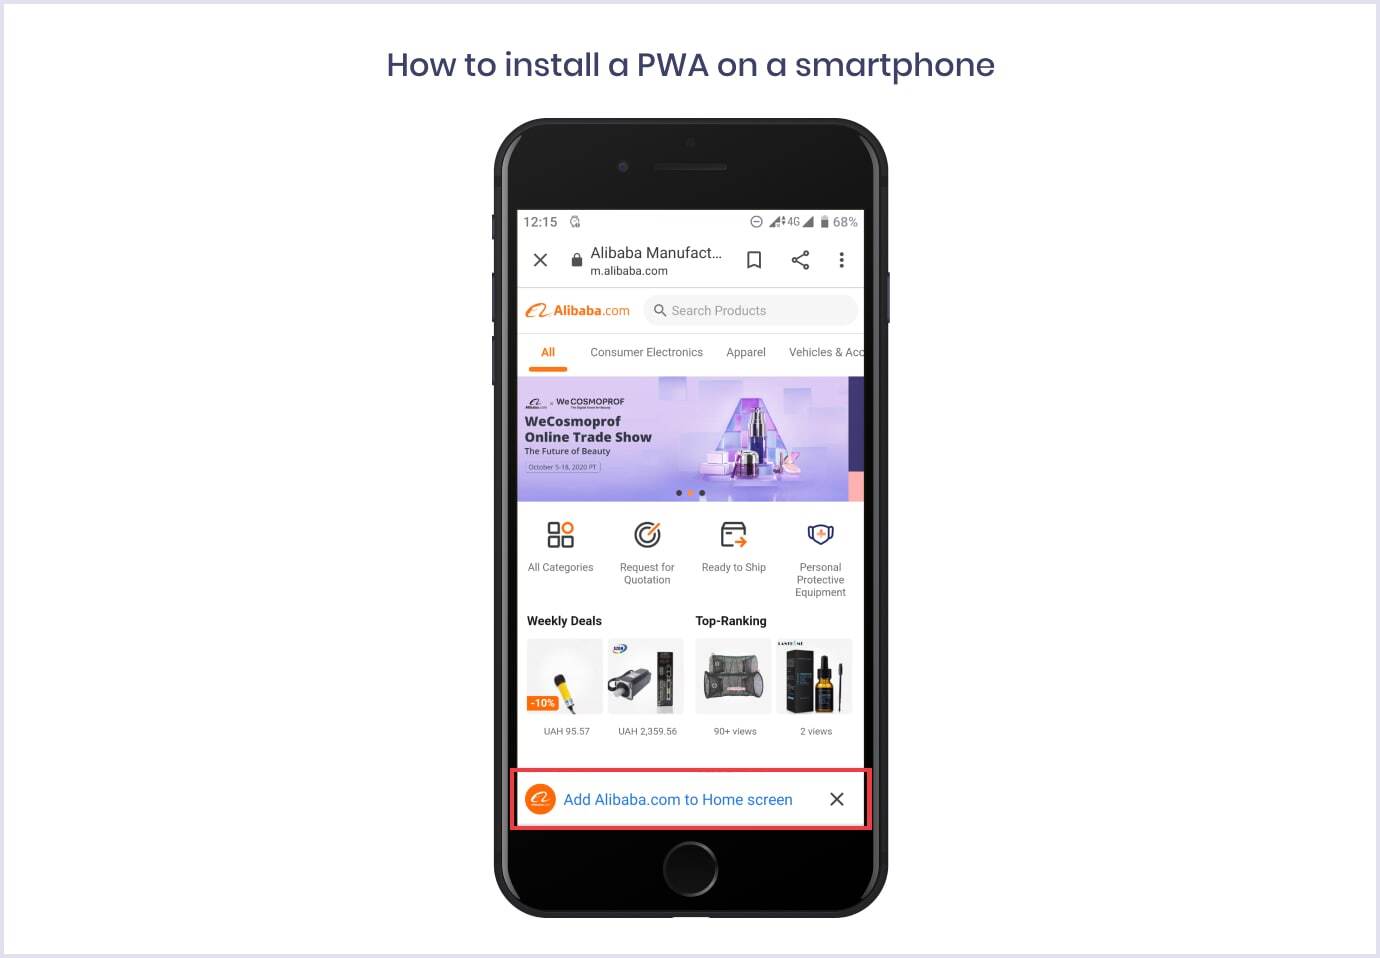
Are you interested in learning more about the differences of progressive web apps and native apps? Discover the details in our thorough analysis of these technologies.
PWA development basics
We have shortly discussed what PWAs are. And now, it is time to go further to the core and discover what makes PWAs so powerful.
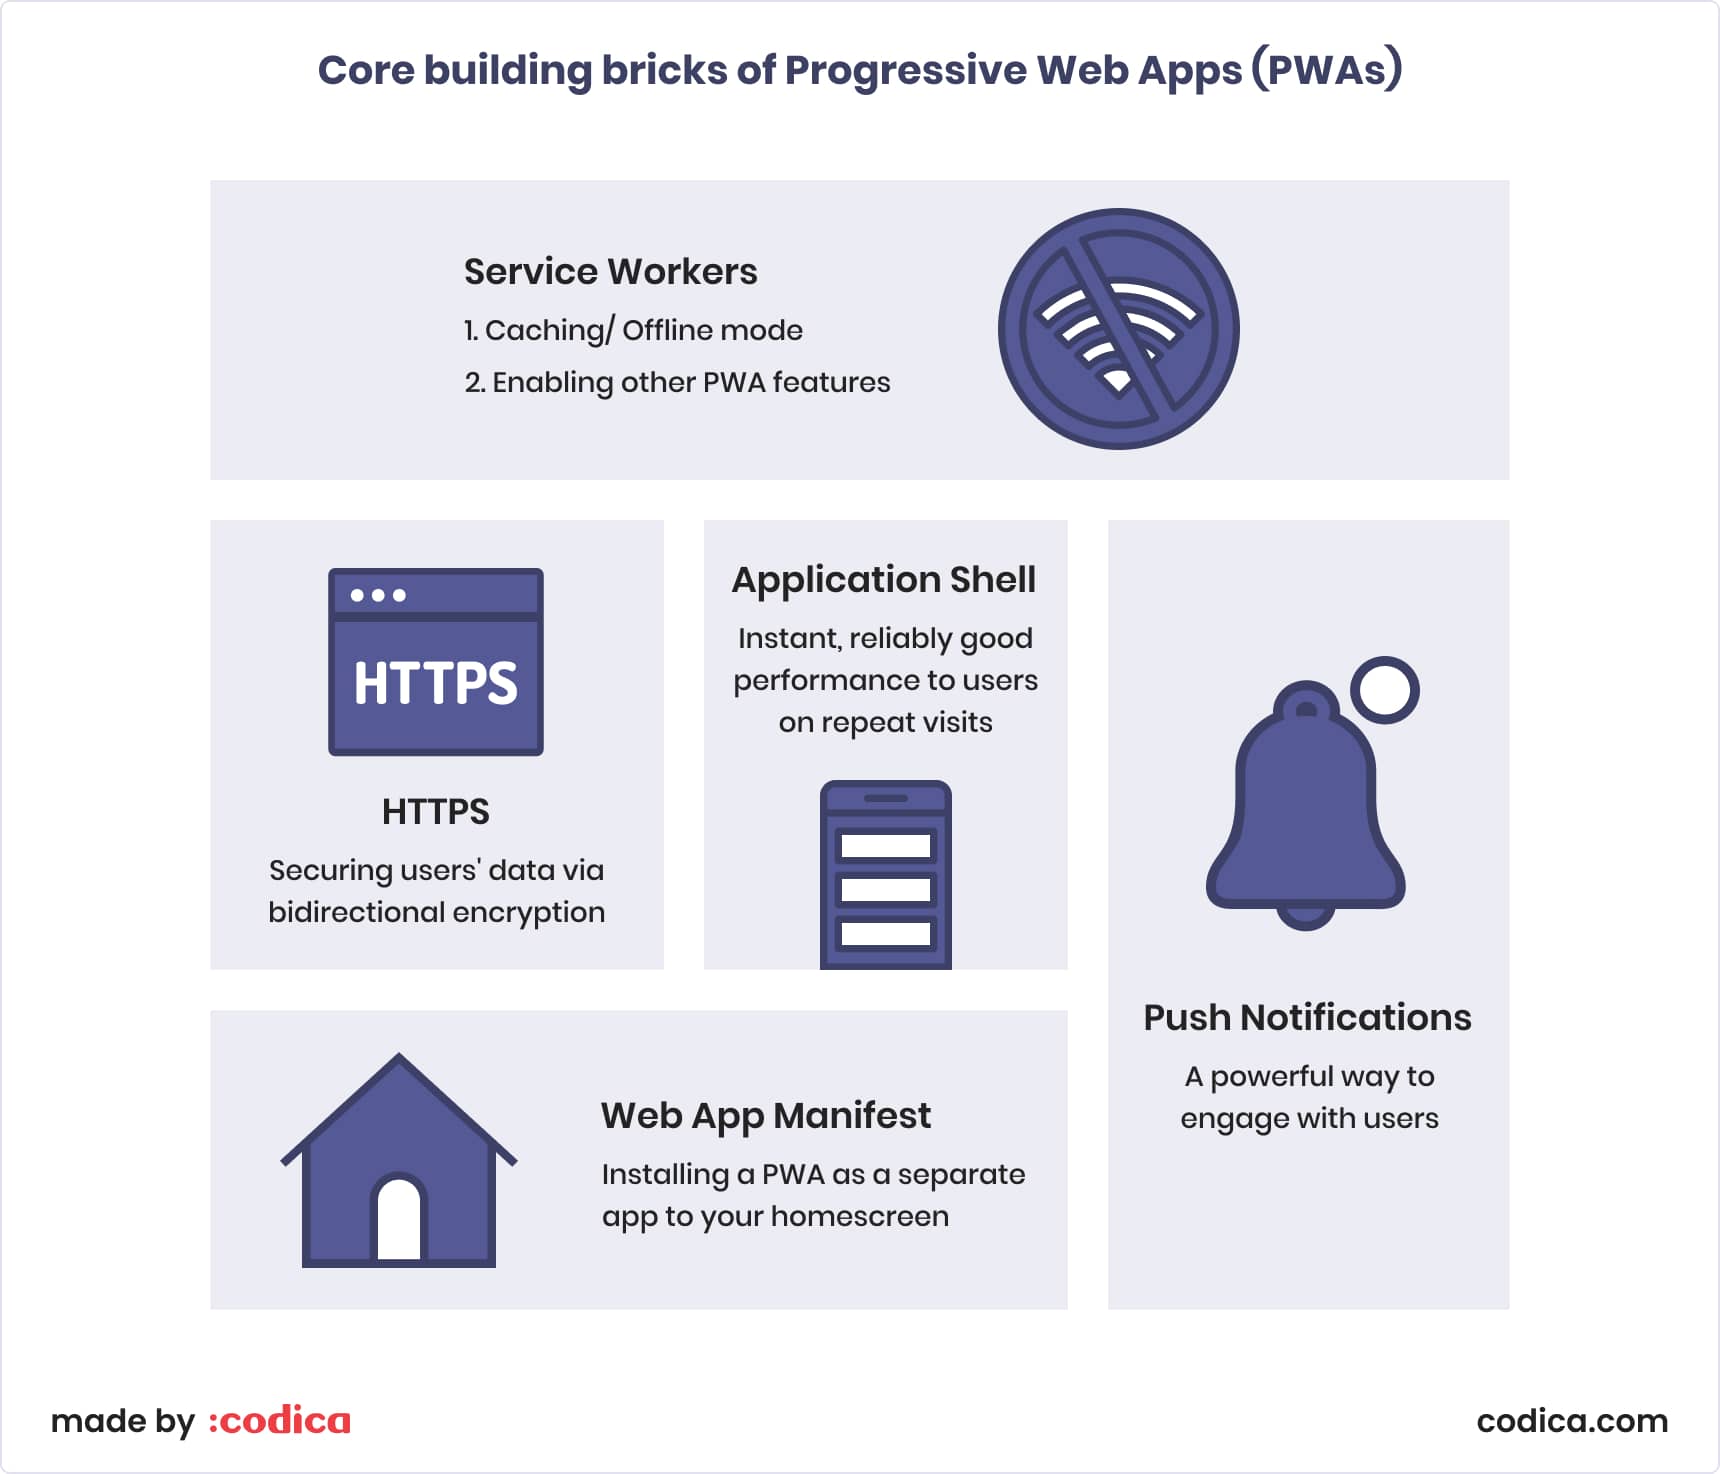
Web technologies that fuel progressive web apps:
- service workers;
- web manifests;
- application shell;
- HTTPS.

What is a service worker?
The technical foundation of a PWA is provided by service workers. A service worker is a code that your browser processes in the background to enable offline work for web applications. It intercepts and handles network requests, acting as an intermediary between your browser and the network.
With service workers, a PWA can cache and use the cached files, providing seamless user experience. It allows for web apps to dynamically load as you navigate around the app and minimize data traffic. It is very much like the behavior we see in native apps.
What is the point of a web application manifest?
The web app manifest is a JSON file that defines the interface of the PWA. It determines the way progressive web apps can be downloaded and shown to the user just like a native application from the app store.
Web app manifests include the app's name, description, styling, and list of needed resources. Unlike regular web applications that are just bookmarks, PWAs can use regular Web APIs and be installed on a device’s home screen.
At the time of writing, browsers that support web app manifests include mobile Opera, Firefox, UC Browser, and Samsung Internet. And mobile Safari browser provides partial support. And desktop support is presented by Chrome browser.
If you want to learn more about the architecture of PWA, check the section about its core elements in our elaborated article.
Further reading: Breaking Down the Cost of PWA Development: Insights and Best Practices
Why choose React for building a progressive web app?
React is an open-source library for JavaScript originally created by Jordan Walke from Facebook in 2013. React was developed for building user interfaces in a fast, simple, and scalable way. The Facebook team maintains the library, and now it is implemented in their products like Facebook and Instagram.
React is a clear frontrunner by the number of JavaScript package downloads hitting the point of 8,227,335 downloads per week. Below you can see the downloads frequency comparison between React, Vue, Angular, and Ember frameworks.

Source: npm trends

React helps develop large and extensible web applications that support hot reloading. It means that your app will keep running while you edit it at runtime. This feature is especially valuable for tweaking the UI functionality. Another hot feature for building UI with React is great code reusability provided by the ‘Learn once, write anywhere’ principle.
Let's discuss the main advantages of React for progressive web application development.
High-powered
React is great in creating fast and scalable web applications and avoiding performance issues. JavaScript apps often experience performance issues related to DOM (Document Object Model) manipulation. The DOM is a structural representation of your web page, allowing programming languages to interact with it.
React uses virtual DOM to make changes to the UI without redrawing the whole page and experiencing rendering issues. With React, you can make changes to the page in the virtual memory instead of using code-heavy bootstrapping libraries like JQuery. Also, React’s faster rendering speed reduces page load time.
Easy to learn
Compared to Angular or Ember JS frameworks, React is not that complicated to learn. If you are wondering how to make a React progressive web application, do not think of it as rocket science.
React supports JSX, a syntax extension that allows writing HTML-like syntax in your JavaScript code. However, you are not bound to use JSX in React – it is just a simpler way for your convenience. So, you can use plain JavaScript and HTML & CSS to build a powerful PWA with React.

Well-equipped
React has many developer tools, boilerplates, and libraries to make debugging, testing, and design easier. It offers a variety of options so you can choose the one that will suit your particular task the most. The most prominent examples are React Developer Tools, Create React App by Facebook, Semantic UI React, Ant Design.
Do you want to boost your web development with React? Broaden your knowledge about proven React tools and practices by reading our detailed article.
SEO-friendly
The common SEO-related issue is failures in Web Rendering Service when working with heavy web applications. It means that the parts of your website can not be shown in Google search results. Thanks to the use of virtual DOM, your content on React-powered web pages will be indexed correctly.
Community-backed
React is the fifth frequently starred open-source repository on Github at the time of writing. And the community of React developers is strong and responsible. Their slogan says it all: “Help us push the web forward and get involved.”
StackOverflow, the largest community of programmers, has more than 248,000 questions within the tag #reactjs.
Progressive web app examples built with React
By way of illustration, let’s see great PWA examples powered by React – Starbucks and Tinder. These companies know how to make a React progressive web application that is powerful and responsive. Considering that, these apps will serve as a clear demonstration of React capabilities and what can be achieved with its help.
Starbucks
Famous multinational chain of coffeehouses wanted to get a progressive web app for easy and fast online ordering. The company already had mobile applications with the same functionality, but with PWA, they got a 98% reduction of the app size. It was a determining factor for rural areas with a less reliable network connection, as shown in Starbucks case study.
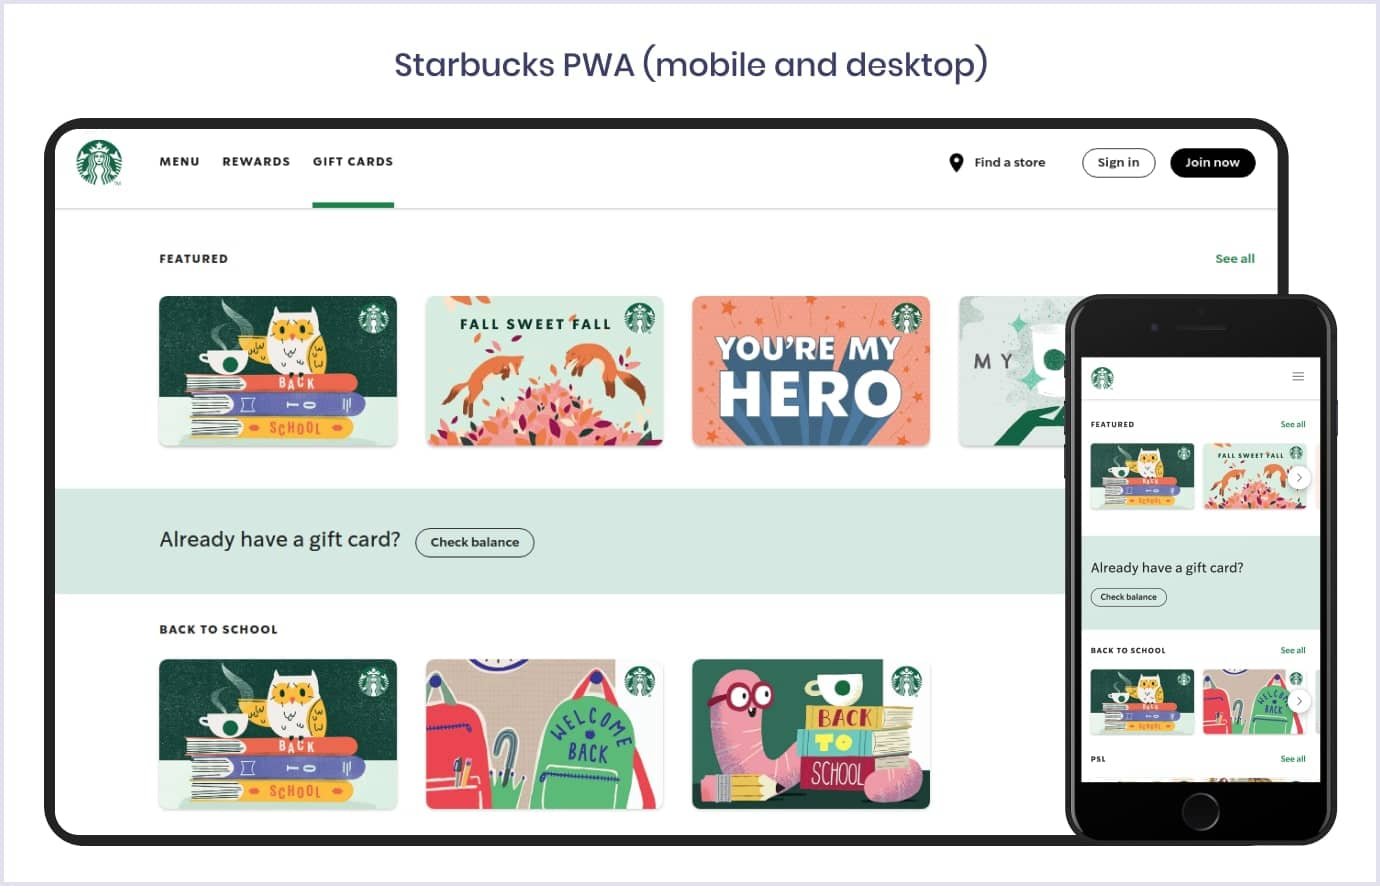
The PWA technology provides user-friendly menu browsing, order customization, and cart usage. And all these features are accessible even in an offline mode. Starbucks’ progressive web app experience is pretty similar to what mobile application development services provide. That is why many Starbucks users switched from its mobile app to the web.
By the way, regarding mobile software development services, we have a nice bonus for you. Our team of experts has prepared the ultimate guide to mobile app development.
The launch of the powerful and easy-to-use PWA enabled Starbucks to expand the business successfully. The company doubled the number of daily active users and boosted the orders from desktops to be nearly the same rate as orders from smartphones.

Source: PWA Stats
Also, the development of a progressive web app enabled Starbucks to get their indexability improved. React web app improved SEO and allowed mobile users to find the Starbucks app on the search result page when they looked for “coffee near me”.
Tinder
In 2017, the well-known online dating application released a progressive web app, Tinder Online. It was a part of the company's expansion to countries with poor mobile internet connectivity. Tinder Online allows users to browse the app fast and smooth without waiting for their matches.

The progressive web app built with React and Redux allowed Tinder to achieve such great results:
- Loading time was reduced by 60%.
- PWA is 90% lighter than the native app.
- Users swipe, message, and edit profiles more using Tinder Online than the native app.
- Longer sessions compared to the native app.

How to create a PWA with React?
We have already explored the advantages of the React JavaScript library and saw some great PWA React examples. And now, we get to the heart of the matter, the most interesting and practical part of our article. The following section is a PWA development tutorial that will shed light on how to make a React progressive web application.
If you want to make your existing web application more engaging and fast, you might wonder how to create a PWA from an existing React app. In this case, you will need to start from Step 2 of our guide on how to build a progressive web app using React. Also, to learn more information about converting an existing app to PWA, you can check this manual.
Step 1: Set up a simple React app
We will use the tool we have mentioned above – Create React App (or CRA). It is a very convenient environment for those who do not know yet how to create PWAs with React. It allows you to use the latest JavaScript functionality with built-in Babel and webpack. This is why you do not need to worry about bundling and transpiling that is required for your app to be shipped to the browsers.
With CRA, you are able to install and bootstrap your application with the following commands that you need to run on your terminal:
➜~npx create-react-app cra-pwa --template cra-template-pwa
Here, npx is a command-line tool for running npm packages. The command create-react-app cra-pwa builds the app named ‘cra-pwa’. After a few seconds, you get a bare-bones React app in the cra-pwa directory. The argument --template cra-template-pwa is added to create an app with service worker, as CRA 4 or later does not provide built-in service workers.
You can navigate to this directory with this simple command:
➜~cd cra-pwa
The initial folder structure will look like this:
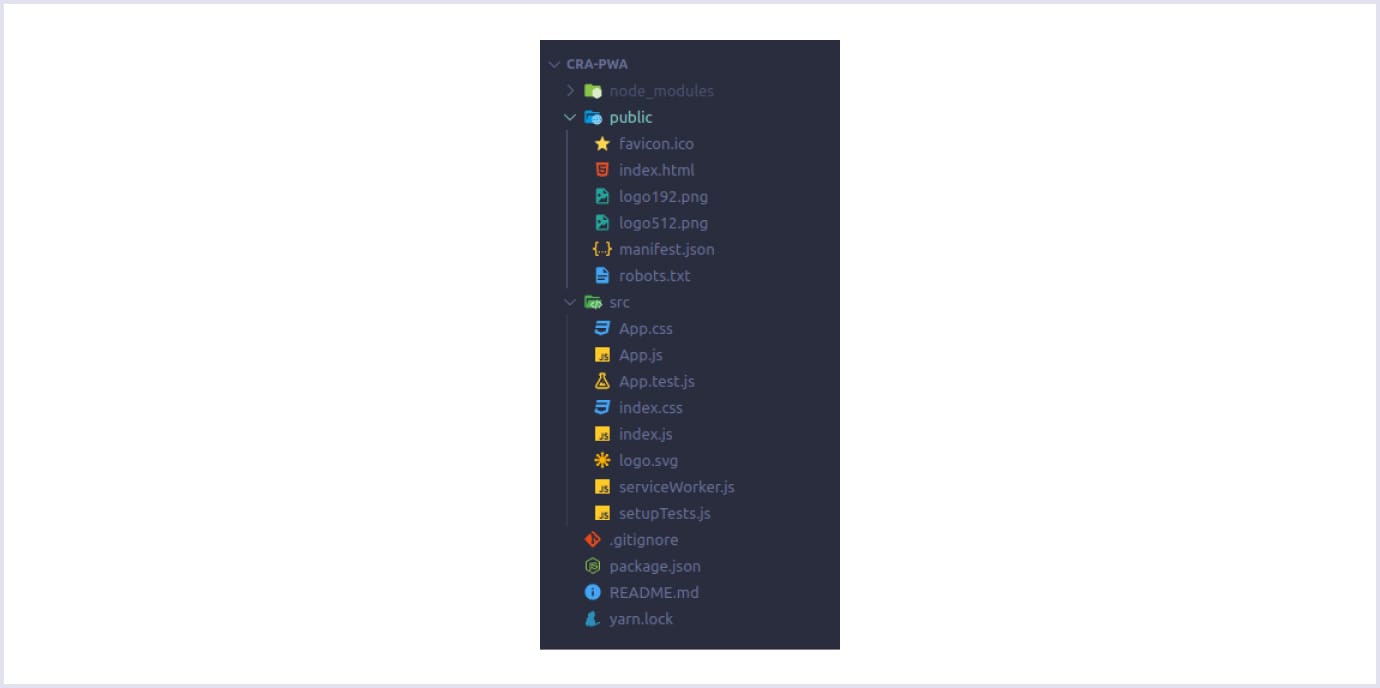
To run your app in the development mode, type the following:
➜~npm start
You can open http://localhost:3000 to view it in your browser.
Step 2: Register a Service Worker
So, CRA provides you all the tools for handling the question of how to create a PWA with React. But how to make a React progressive web application runnable in the offline mode? You have to configure the auto-generated service worker file – register it.
The directory of your newly created project contains the file index.js. Open it and find the following code:
// If you want your app to work offline and load faster, you can change
// unregister() to register() below. Note this comes with some pitfalls.
// Learn more about service workers: https://bit.ly/CRA-PWA
serviceWorker.unregister();
Here, you can see that the serviceWorker is not registered yet. You have to change the unregister() call to register().
So, the question of how to create a PWA with service worker using React is solved. Let’s go to the next one that concerns web app manifest.
Step 3: Configure the Web Application Manifest
The next step will concern the set up of the web app manifest for your progressive web app that is located in the manifest.json file in public directory. Here, you need to alter the metadata that is responsible for the appearance of your application.
When created, your manifest file will look like this:
{
 "short_name": "cra-pwa",
 "name": "cra-pwa",
 "icons": [
   {
       "src": "/android-chrome-192x192.png",
       "sizes": "192x192",
       "type": "image/png"
   },
   {
       "src": "/android-chrome-512x512.png",
       "sizes": "512x512",
       "type": "image/png"
   }
 ],
 "start_url": "/",
 "theme_color": "#F4BD42",
 "background_color": "#2B2929",
 "display": "standalone",
 "scope": "/"
}
Let’s see what these main manifest attributes mean.
short_name: The name of your application, used within the icon, like on the users’ home screens or launchers.name: The name of your app shown in the app stores or browsers on startup screens and prompts. Ifnameproperty is not defined,short_namewill be displayed.icons: The set of icons (or just one), used on the users’ home screens, launchers, task switchers, splash screens, etc.start_url: The URL of the page of your app that your users see on the startup.display: This property is responsible for the browser view. The app can hide the address bar, run in the new window, go fullscreen, etc. See the attributes you can use for it:fullscreen: This option is for opening the app without any browser UI, occupying the entirety of the users’ display.standalone: This option allows for running the app in the new window, like a native app. It will also hide the browser UI elements like an address bar.minimal-ui: This option is quite similar to the previous one, but it comes with the minimal set of browser UI, like back and reload buttons.browser: This option enables the usual browser experience.theme_color: The color of the toolbar in your app.background_color: The color of the splash screen that appears when users click on the app icon in their home screens.
A splash screen is a graphical element that appears when your app is launched. It is a window that contains your application’s name and logo, and it uses the background color defined by you. Chrome browser generates the splash screen based on the following properties in your web manifest:
name;background_color;icons.
Speaking of icons, Chrome will automatically choose the icon that fits the device resolution the most. In most cases, icons with a resolution of 192px and 512px will be enough. But if you want to adapt your logo to as many devices as possible, you can use additional icons.
And finally, to make your web manifest file work, you need to add it to the pages of your web app, like in the example:
<link rel="manifest" href="/manifest.json">
You can check whether the configurations are fine on the Manifest panel under the Application menu in Chrome DevTools. See the screen below:

So, we discussed how to make a progressive web app using React. For more detailed information about adjusting your PWA, check the Web App Manifest guide from the World Wide Web Consortium. There, you can find more about tweaking the app appearance and functionality. Besides, more guidance on how to create a PWA with React can also be found there.
Step 4: Test your PWA
Now, we know how to make a React progressive web application. The next step concerns testing your app.
When you need to run your app in the production mode, type the following commands:
➜~npm run build
➜~npx server build
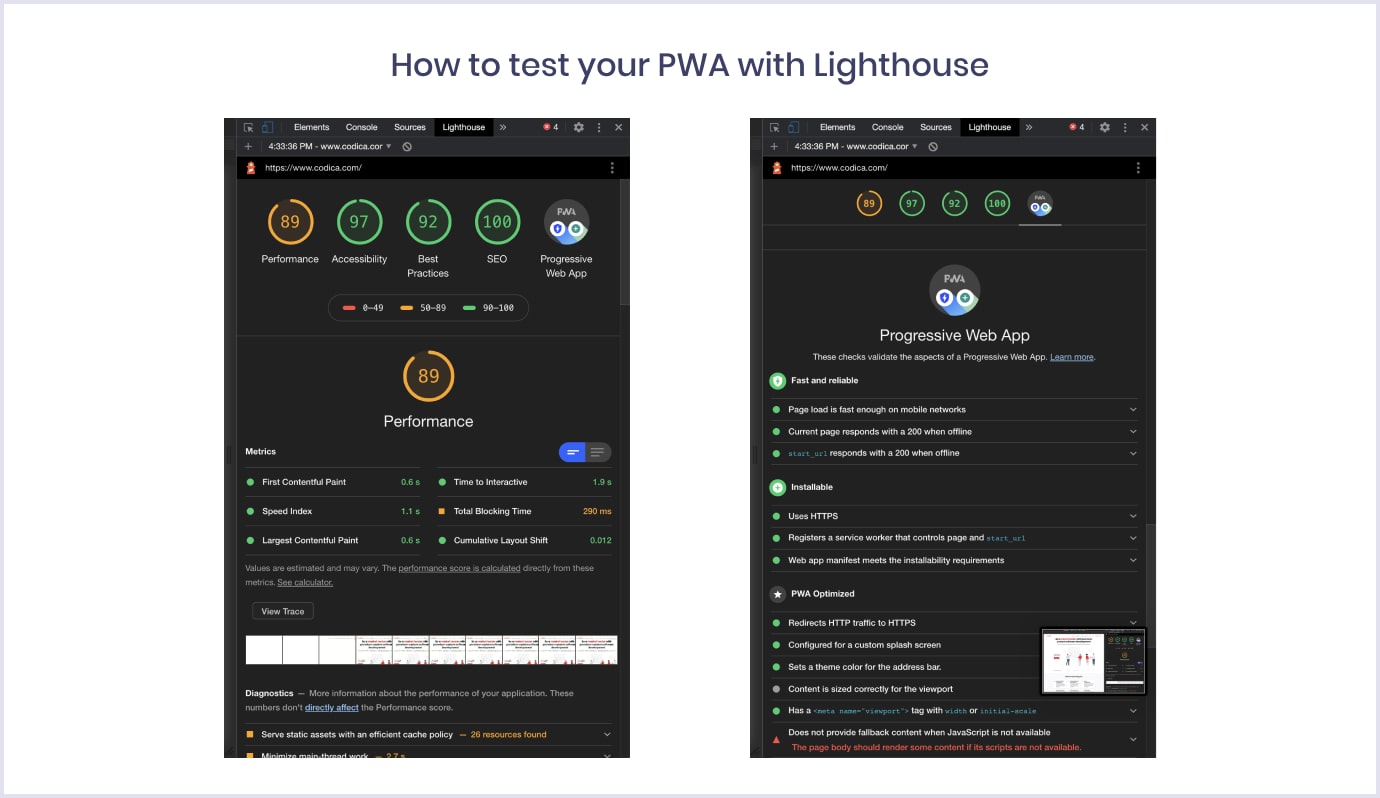
Now you have built your application, and thus, you can test it. Google has created a checklist on PWA, and you can assess your web app using Lighthouse. It is a tool located in the namely tab of Chrome DevTools.
Learn how to check performance, accessibility, and PWA compliance for your application.
Step 1. Open Chrome DevTools by choosing the ‘Inspect’ option from the right-click menu on the page you need to inspect. Or you can use keyboard shortcuts: Command + Option + C (for macOS) or Control + Shift + C (for Windows, Linux, Chrome OS).
Step 2. Go to the Lighthouse tab and click on the ‘Generate report’ button. When you generate a Lighthouse report, make sure you have checked the ‘Progressive Web App’ box.
Once auditing has finished, you get your score and the list of criteria that affect your app's performance in different situations. These hints will give you more information about how to create a PWA with React.
Do you want to enhance your progressive web app user experience even further? Then check out the most powerful PWA design guidelines we have covered in our informative article.
Advanced PWA Usage
Now that we have learned how to create a simple PWA with a service worker using React, it is time to get further. We will show you some of the advanced techniques that will enhance your progressive web app.
Adding shortcuts to React PWA
Shortcuts adding is a fresh feature that brings the web and native apps even closer. They allow users to go directly into a certain action or page by long-pressing the app logo.
You can see the examples on the screenshots below.
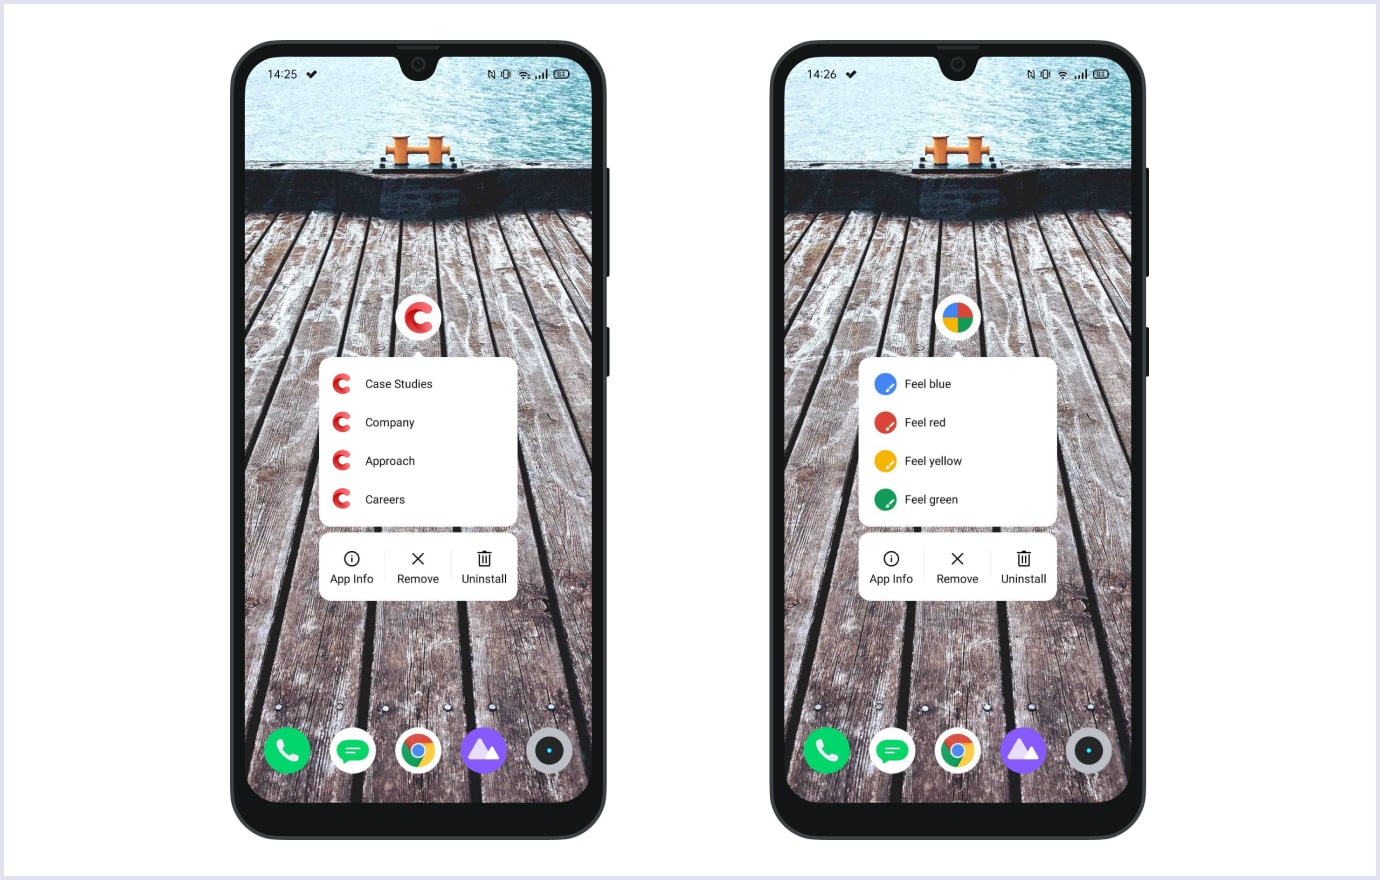
Let’s see how to implement this feature in your React PWA on the example of Codica PWA shown above on the right.
You will need to add the following code to your web app manifest file:
"shortcuts": [
   {
     "name": "Case Studies",
     "short_name": "Case Studies",
     "url": "/case-studies",
     "icons": [
       {
         "src": "/android-chrome-192x192.png",
         "sizes": "192x192",
         "type": "image/png"
       }
     ]
   },
   {
     "name": "Company",
     "short_name": "Company",
     "url": "/company",
     "icons": [
       {
         "src": "/android-chrome-192x192.png",
         "sizes": "192x192",
         "type": "image/png"
       }
     ]
   },
   {
     "name": "Approach",
     "short_name": "Approach",
     "url": "/approach",
     "icons": [
       {
         "src": "/android-chrome-192x192.png",
         "sizes": "192x192",
         "type": "image/png"
       }
     ]
   },
   {
     "name": "Careers",
     "short_name": "Careers",
     "url": "/careers",
     "icons": [
       {
         "src": "/android-chrome-192x192.png",
         "sizes": "192x192",
         "type": "image/png"
       }
     ]
   },
   {
     "name": "Blog",
     "short_name": "Blog",
     "url": "/blog",
     "icons": [
       {
         "src": "/android-chrome-192x192.png",
         "sizes": "192x192",
         "type": "image/png"
       }
     ]
   },
   {
     "name": "Get a free quote",
     "short_name": "Get a free quote",
     "url": "/contacts",
     "icons": [
       {
         "src": "/android-chrome-192x192.png",
         "sizes": "192x192",
         "type": "image/png"
       }
     ]
   }
 ]
Web Share API integration
When you already know how to create a PWA with React, you might wonder what other native features this app can adopt. That is why we want to tell you about Web Share API that can grant native sharing capabilities. It means your progressive web application can share text, links, and files to other apps on the device just like natives. Moreover, web applications can receive text, links, and files from other apps installed on the smartphone, i.e., PWA can become share targets.
Sharing text and links
To implement sharing text and links, you need to create a JS file that will be responsible for advanced sharing. Add the following code into your new file (do not forget to customize it to your needs):
if (navigator.share) {
  let url = document.location.href;
  const canonicalElement = document.querySelector('link[rel=canonical]');
  if (canonicalElement !== null) {
      url = canonicalElement.href;
  }

  navigator.share({
    title: 'Codica',
    text: 'Codica',
    url
  })
    .then(() => console.log('Successful share'))
    .catch((error) => console.log('Error sharing', error));
}
File sharing
If you want to implement file sharing, you need to test if the files provided can be accessed by the navigator.canShare() method and then call this method. After this, an array of files need to be included in the call to navigator.share(). Consider the code below as an example:
if (navigator.canShare && navigator.canShare({ files: filesArray })) {
  navigator.share({
    files: filesArray,
    title: 'Codica Team Pictures',
    text: 'Photos from March 18 to September 19.',
  })
  .then(() => console.log('Share was successful.'))
  .catch((error) => console.log('Sharing failed', error));
} else {
  console.log(`Your system doesn't support sharing files.`);
}
Bottom line
In this article, we have addressed many exciting topics about progressive web applications and how to create a PWA with React. Also, we have discussed notable progressive web app examples and examined some advanced features.
Many world-known companies and small startups have profited from PWAs, which are a golden mean between native and web apps. Also, progressive web apps development is considered to be more resource-effective. So it is a perfect time to start gaining profit from this robust and promising technology.
If you need help with building PWA for your business, our team is ready to consult you about progressive web application development. Also, you can discover one of our favorite PWA case studies.
As a progressive web app development company, we are eager to share our knowledge and expertise in building high-end software that we are proud to share. And we hope that our guide on how to create a PWA with React will be useful for React beginners and web development enthusiasts. Also, you can check other tech articles by our team.
